OpenID4VCI: A Developer's Guide to Verifiable Credential Issuance
Welcome to the developer's guide to OpenID for Verifiable Credential Issuance (OID4VCI). In the world of digital identity, if a Verifiable Credential is your new digital passport, then OID4VCI is the standardized, secure, and interoperable process for the government office (the Issuer) to hand it to you and place it in your digital Wallet.
This protocol is not just a theoretical proposal; it's a foundational component of the next generation of digital identity infrastructure. In this guide, we will move beyond abstract specifications to provide a complete walkthrough of the protocol, from its core concepts and technical flows to practical implementation examples. You will learn exactly how OID4VCI works, how it relates to its counterpart, OpenID4VP, and how you can be used together with already existing identity platforms like Keycloak.
What is OpenID4VCI? (The Simple Explanation)
OpenID for Verifiable Credential Issuance (OID4VCI) is an open standard that defines a secure API for issuing Verifiable Credentials (VCs). The protocol is built on top of the widely adopted and developer-friendly patterns of OAuth 2.0 and OpenID Connect. This design choice significantly lowers the barrier to entry for developers, allowing existing identity systems to be extended to support credential issuance.
However, the true significance of OID4VCI lies in its role as core infrastructure for digital identity initiatives worldwide. In Europe, eIDAS 2.0 mandates that by 2026 every member state must offer a European Digital Identity Wallet (EUDI Wallet). To make this ecosystem work, credential issuance must be standardized, and the EU’s Architecture and Reference Framework (ARF) explicitly names OID4VCI as the required protocol.
Globally, momentum is similar. The U.S. is piloting mobile driver’s licenses, while South Korea, Japan, and Australia align digital ID programs with global standards. Canada and several Latin American countries are testing digital credentials. Across regions, OID4VCI is emerging as the common language enabling verifiable, privacy-preserving credentials to flow into wallets everywhere.
Learning OID4VCI is not just about understanding a new protocol; it’s about equipping yourself with the technical mechanism that governments, enterprises, and ecosystems worldwide are aligning on to make digital identity practical, interoperable, and trustworthy.
Core Concepts: The Actors and Components
To understand OID4VCI, you first need to understand the key players and the components they exchange. The protocol defines a clear set of roles and data structures that enable a secure and interoperable ecosystem.
Issuer, Holder, Wallet, and Verifier
The OID4VCI ecosystem is composed of four primary actors:
- Issuer: This is the organization that creates, cryptographically signs, and issues a Verifiable Credential. In the context of OID4VCI, the Issuer acts as an OAuth 2.0 Resource Server and may also serve as an Authorization Server, managing the authorization process for issuance. Examples include a university issuing a digital diploma or a government agency issuing a digital driver's license.
- Holder: This is the entity that receives and maintains control over a credential, typically through a digital Wallet. In most cases, the Holder is the end-user or subject to whom the claims in the credential apply (e.g., a student holding their diploma). However, the Holder may also act on behalf of the subject — for example, a parent holding a child’s credential or an organization holding credentials about its employees.
- Wallet: This is the software, typically a mobile application, that the Holder uses to request, receive, store, and later present their credentials. From a technical perspective, during the OID4VCI flow, the Wallet acts as an OAuth 2.0 client application.
- Verifier: This is an organization that requests proof of a credential from the Holder in order to grant access to a service or resource. For example, a car rental agency acts as a Verifier when it asks to see a driver's license. While the Verifier is the primary recipient in the OpenID4VP (presentation) flow, defining it here is essential for understanding the full credential lifecycle.
What is a Verifiable Credential?
A Verifiable Credential (VC) is a digital, tamper-evident collection of claims (or attributes) that an Issuer makes about a Holder. A key feature of the OID4VCI protocol is that it is format-agnostic, meaning it can be used to issue credentials in multiple formats. This flexibility allows it to support a wide range of use cases and technical requirements. The most common formats include:
- W3C Verifiable Credentials Data Model (VCDM): A flexible JSON-based format.
- SD-JWT VC: A format based on Selective Disclosure JWTs that enhances privacy by allowing the Holder to reveal only specific claims from a credential.
- ISO mdoc: The format used for mobile Driver's Licenses (mDL) as defined in the ISO/IEC 18013-5 standard.
Here is a simple example of what the claims inside a W3C Verifiable Credential might look like in JSON:
{
  // The contextual information required for data integrity and 1.api
  "@context": [
    "https://www.w3.org/2018/credentials/v1",
    "https://www.w3.org/2018/credentials/examples/v1"
  ],
  "id": "http://example.gov/credentials/3732",
  // The credential's unique identifier
  "type": [
    "VerifiableCredential",
    "UniversityDegree"
    // Specifies the kind of credential being issued
  ],
  "issuer": {
    "id": "did:web:vc.transmute.world"
    // The issuer's unique identifier (DID)
  },
  "issuanceDate": "2020-03-10T04:24:12.164Z",
  // When the credential was issued
  "credentialSubject": {
    // Information about the credential's recipient and the degree earned
    "id": "did:example:ebfeb1f712ebc6f1c276e12ec21",
    "degree": {
      "type": "BachelorDegree",
      "name": "Bachelor of Science and Arts"
    }
  }
}
The Credential Offer & The Credential Issuer Metadata
Two final components are crucial for initiating the issuance flow:
- Credential Issuer Metadata: For a Wallet to interact with an Issuer, it must first know what the Issuer's capabilities are. This is achieved through a standardized discovery document. The Issuer hosts a public JSON file at a well-known location (
/.well-known/openid-credential-issuer) that contains its metadata. This file tells the Wallet everything it needs to know, including the location of itscredential_endpointandtoken_endpoint, the types of credentials it supports (credential_configurations_supported), and the required cryptographic methods. This metadata-driven approach is the key to the protocol's scalability, as it allows any compliant Wallet to interact with any compliant Issuer without prior manual configuration. - Credential Offer: This is an invitation from the Issuer to the Wallet to begin the issuance process. It can be delivered as a complete JSON object or, more commonly, as a URL (
credential_offer_uri) that points to the object. This offer is often embedded in a QR code or a deep link. The offer contains thecredential_issuer's URL, which the Wallet uses to fetch the metadata, and a list ofcredential_configuration_idsthat specify which credentials are being offered.
Issuance Flow Variations
- Issuer-initiated: The Credential Issuer starts the issuance by creating and communicating a Credential Offer to the wallet (for example via a QR code or deep link). The wallet then sends the issuance-related requests in response to that offer.
- Wallet-initiated: The wallet starts the issuance by sending requests to the issuer without first receiving a Credential Offer. Instead, the wallet relies on issuer metadata or prior knowledge of the issuer and starts the OAuth/issuance flow directly.
The Complete OpenID4VCI Flow Explained (With Diagrams)
The OID4VCI protocol defines a precise sequence of interactions between the Wallet and the Issuer. The process is designed to be both secure and flexible, accommodating different use cases through two primary authorization flows.
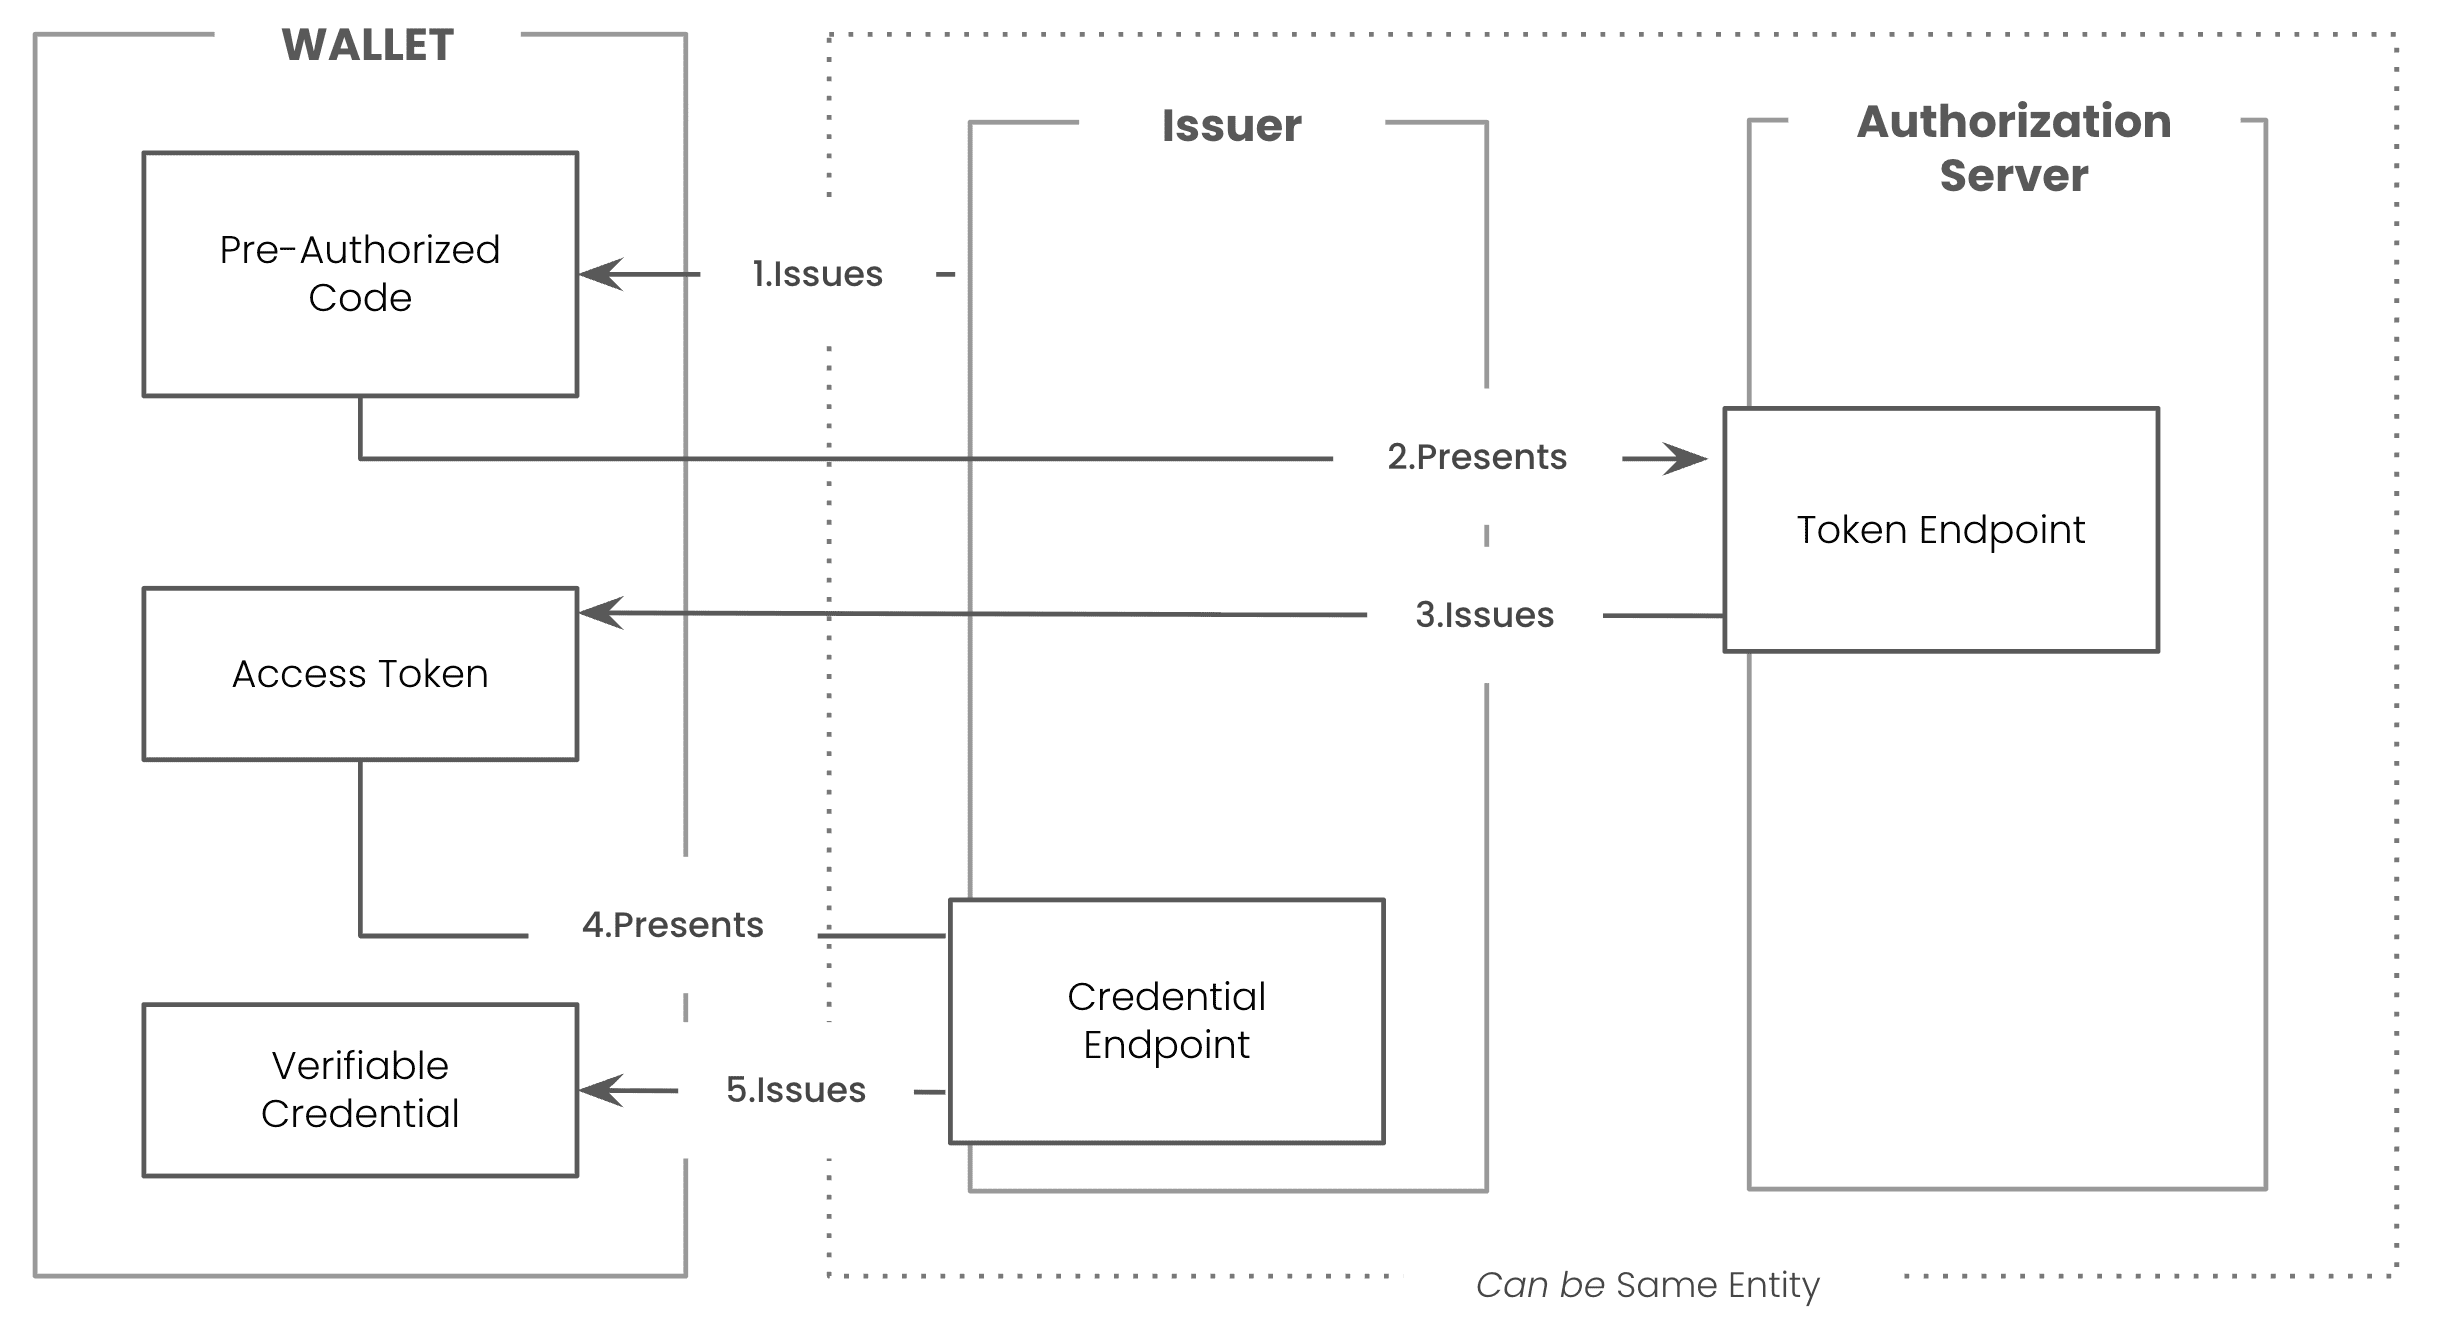
Pre-Auth Flow
Authorization Code Flow
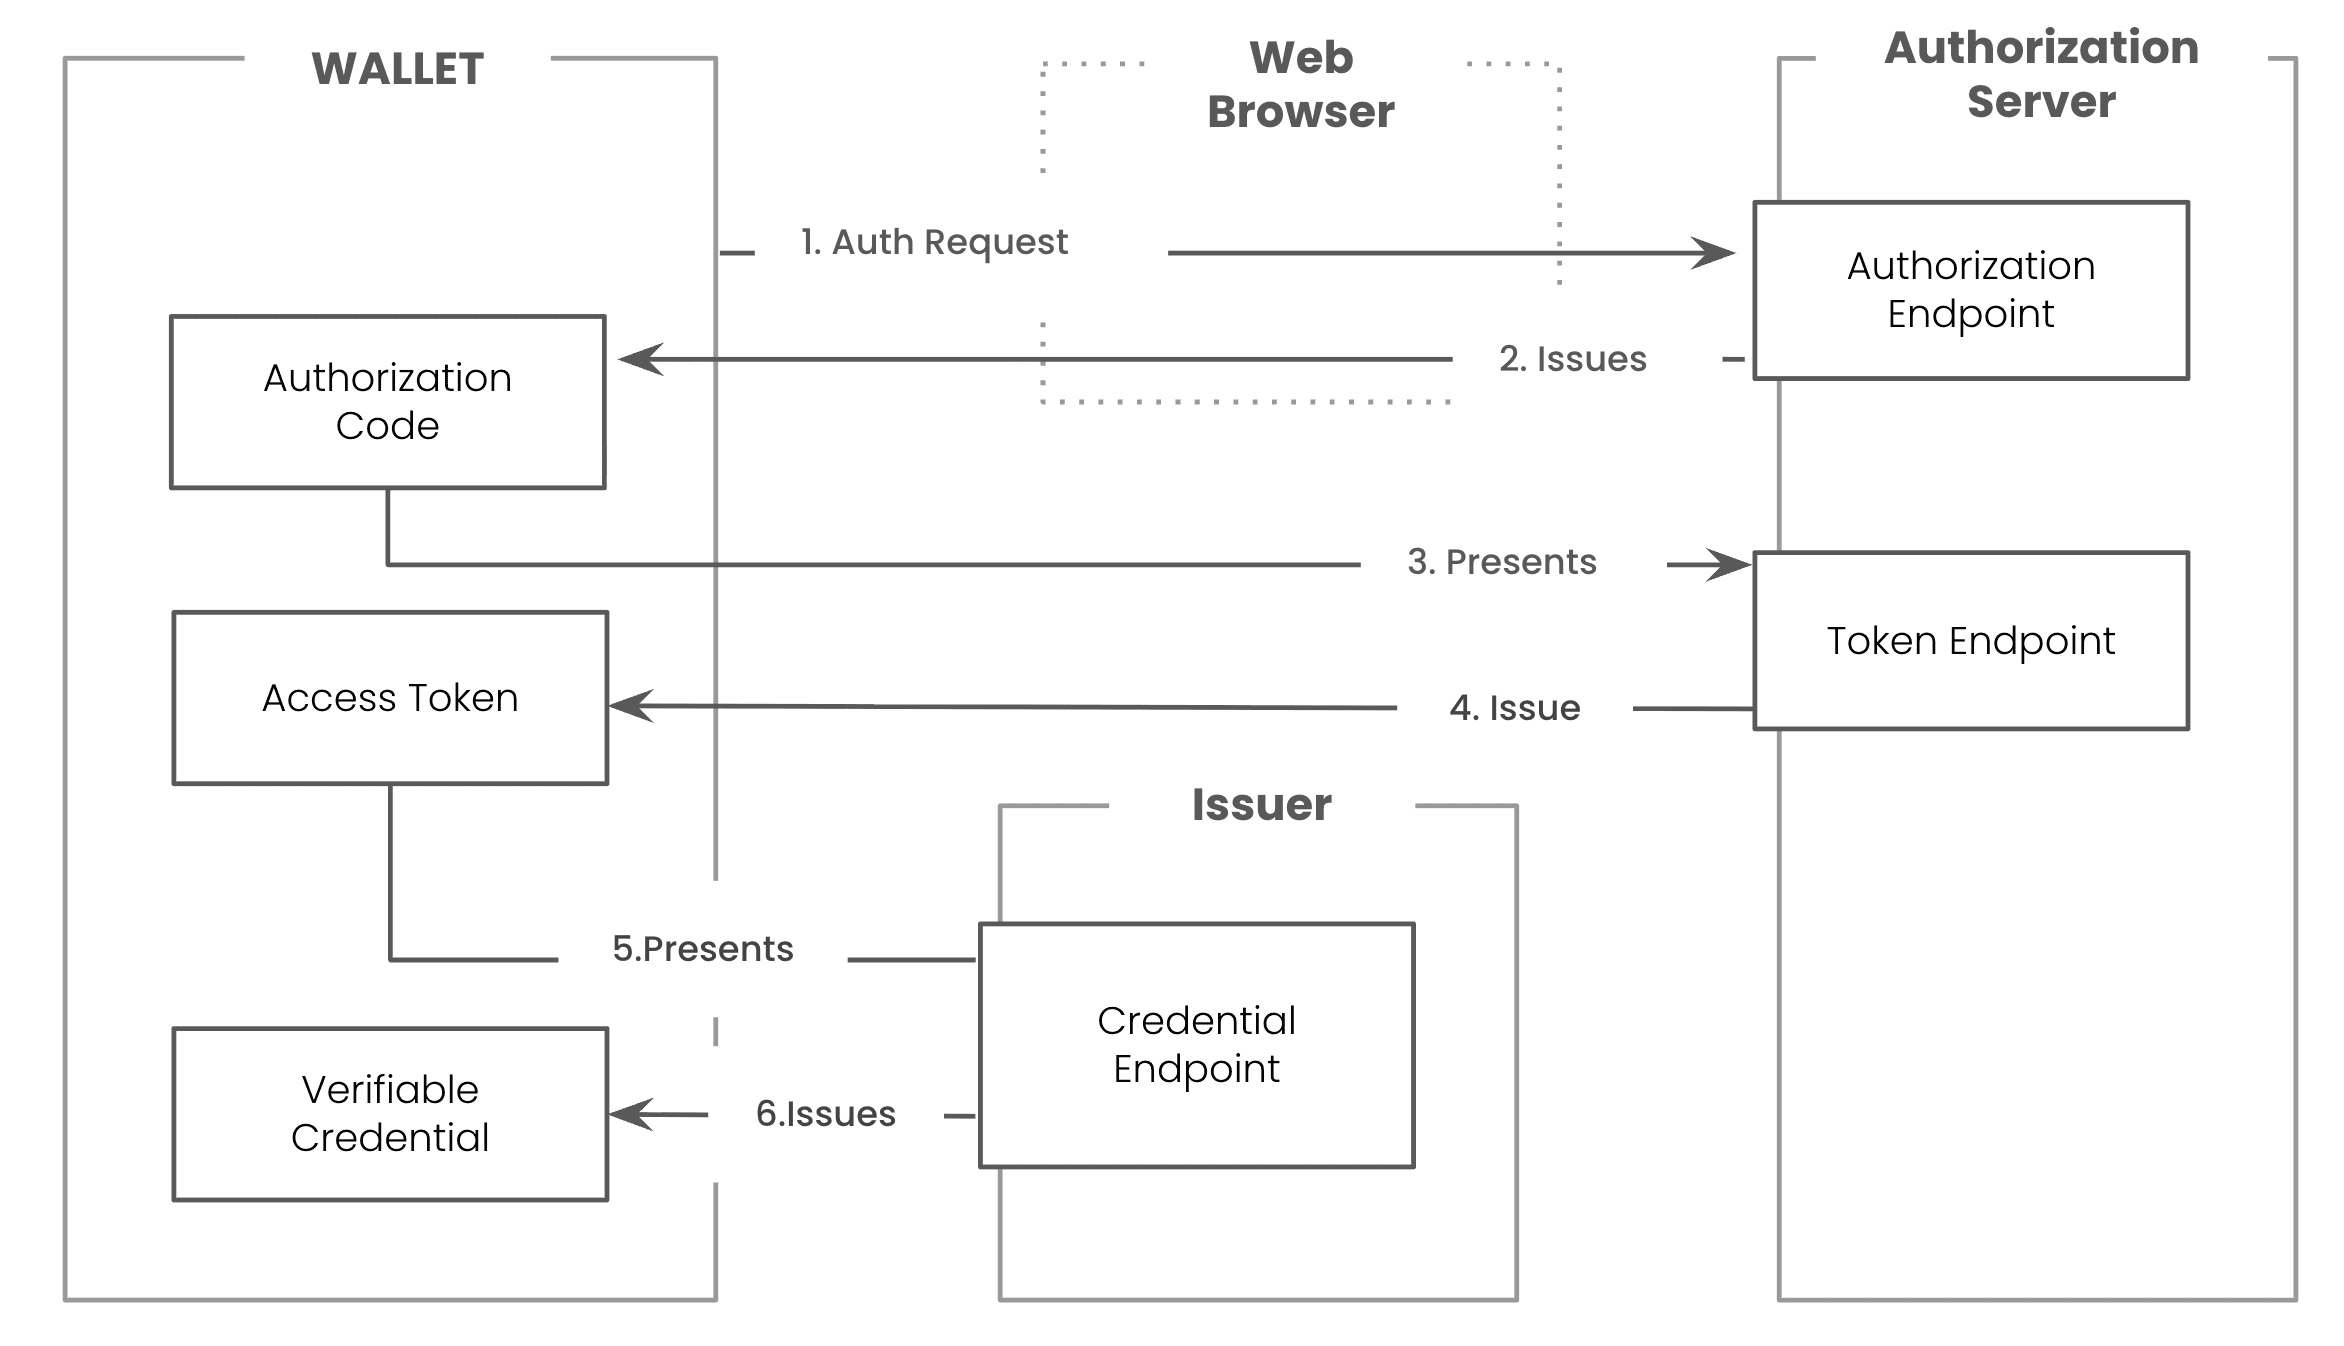
Step 1: The Credential Offer (QR Code, Deep Link)
The journey begins when you, the Holder, use your Wallet to interact with a Credential Offer. Most commonly, this involves scanning a QR code on an Issuer's website (e.g., a university portal after graduation) or clicking a deep link sent to you via email. This offer acts as the inital step, providing your Wallet with the initial information it needs to find the Issuer and begin the process.
Step 2: The Authorization Flow (Authorization Code vs. Pre-Authorized Code)
After processing the offer and fetching the Issuer's metadata, the Wallet must get authorization to receive the credential. OID4VCI provides two distinct flows for this purpose, and the choice depends on whether your identity is already known to the Issuer at the time of the offer.
- Authorization Code Flow: This is the standard, browser-based login flow familiar to anyone who has used "Sign in with Google." It is used when the Credential Offer is generic or public, and the Issuer needs to verify your identity before issuing a personalized credential. Your Wallet will redirect you to the Issuer's authorization server, where you authenticate (e.g., with a username and password). Upon success, the server sends an authorization code back to the Wallet.
- Pre-Authorized Code Flow: This flow is used when the Issuer has already authenticated you and knows who you are. For instance, you might be logged into your secure online banking portal and click a button to "Get Digital Account Statement." In this case, the Issuer generates a secure, single-use pre-authorized code and embeds it directly into the Credential Offer. Your Wallet receives this code and can proceed directly to the next step without requiring you to log in again.
The Token Request & The Proof of Possession (c_nonce and JWT)
With either an authorization code or a pre-authorized code in hand, your Wallet makes a direct, back-channel POST request to the Issuer's Token Endpoint. The goal is to exchange the code for an Access Token, which serves as the key to unlock the final credential.
This step includes a critical security mechanism called Proof of Possession. The issued credential must be cryptographically bound to a key that only your Wallet controls.
To prove this, the Wallet first obtains a fresh c_nonce from the Issuer’s Nonce Endpoint. It then creates a signed JSON Web Token (JWT) proof that includes the Issuer’s identifier as aud and the c_nonce in the nonce claim, signing it with the Wallet’s private key. This proof is then sent in the Credential Request (the final step) so the Issuer can verify the Wallet controls the key to which the credential will be bound, preventing interception and replay. (Earlier drafts of OID4VCI provided the c_nonce via the Token Endpoint, but the current specification uses the Nonce Endpoint and/or Credential Response for this purpose)
Step 4: The Credential Request & Issuance
The final step is the credential request itself. The Wallet makes a POST request to the Issuer's Credential Endpoint. This request includes two vital pieces of information:
- The Access Token obtained in Step 3, which authorizes the request.
- The signed JWT
proofcontaining thec_nonce, which proves possession of the key.
The Issuer validates the access token and the proof. If everything is correct, it constructs the Verifiable Credential, signs it with its own private key, and returns it in the response body. Your Wallet receives the credential and stores it securely, ready for you to use.
Practical Implementation: A Hands-On Walkthrough
Theory is essential, but code makes it concrete. Let's walk through how you can interact with an OID4VCI Issuer using practical examples. You can use a dedicated tool like walt.id's Issuer to see how these offers are managed in a real-world environment.
Step 1: View Live Issuer Metadata
Before a Wallet can do anything, it must fetch and parse the Issuer's metadata. This is a simple HTTP GET request to the /.well-known/openid-credential-issuer endpoint.
Here is an example of what that metadata file looks like, with comments explaining the key fields:
{
  // REQUIRED — The Credential Issuer's identifier.
  // MUST be the same origin used to fetch this metadata (/.well-known/openid-credential-issuer).
  "credential_issuer": "https://issuer.demo.walt.id/draft13",

  // OPTIONAL — List of OAuth 2.0 Authorization Server identifiers the issuer relies on.
  "authorization_servers": [
    "https://issuer.demo.walt.id/draft13"
  ],

  // REQUIRED — HTTPS URL of the Credential Endpoint where the Wallet requests credentials.
  "credential_endpoint": "https://issuer.demo.walt.id/draft13/credential",

  // OPTIONAL — HTTPS URL of the Deferred Credential Endpoint to poll for later-ready credentials.
  "deferred_credential_endpoint": "https://issuer.demo.walt.id/draft13/credential_deferred",

  // OPTIONAL — HTTPS URL of a Notification Endpoint the Wallet can call to report status events.
  "notification_endpoint": "https://issuer.demo.walt.id/draft13/notification",

  // OPTIONAL — Server capabilities for encrypting the Credential Request (application-layer encryption on top of TLS).
  "credential_request_encryption": {
    // REQUIRED — JWK Set containing public keys the Wallet uses for key agreement/encryption of the request.
    "jwks": {
      "keys": [
        {
          "kty": "EC",
          "crv": "P-256",
          "x": "AAAAAAAAAAAAAAAAAAAAAAAAAAAAAAAAAAAAAAAAAAA",
          "y": "BBBBBBBBBBBBBBBBBBBBBBBBBBBBBBBBBBBBBBBBBBB",
          "kid": "req-key-1",
          "use": "enc"
        }
      ]
    },
    // REQUIRED — Supported JWE 'enc' values the endpoint can decrypt for requests.
    "enc_values_supported": ["A256GCM"],
    // OPTIONAL — Supported JWE 'zip' compression values for requests.
    "zip_values_supported": ["DEF"],
    // REQUIRED — Whether application-layer encryption of requests is required.
    "encryption_required": false
  },

  // OPTIONAL — Server capabilities for encrypting the Credential Response (on top of TLS).
  "credential_response_encryption": {
    // REQUIRED — Supported JWE 'alg' values for encrypting the response JWT.
    "alg_values_supported": ["ECDH-ES"],
    // REQUIRED — Supported JWE 'enc' values for encrypting the response JWT.
    "enc_values_supported": ["A256GCM"],
    // OPTIONAL — Supported JWE 'zip' compression values for responses.
    "zip_values_supported": ["DEF"],
    // REQUIRED — Whether encryption of responses is required. If true, Wallet MUST supply keys in the request.
    "encryption_required": false
  },

  // OPTIONAL — Indicates support for issuing multiple credentials in one call to the same Credential Endpoint.
  // The presence of this object means multiple proofs can be supplied, and multiple credentials can be returned.
  "batch_credential_issuance": {
    // REQUIRED — Maximum array size for the 'proofs' parameter in a Credential Request. MUST be >= 2.
    "batch_size": 5
  },

  // OPTIONAL — Human-readable branding for the issuer, possibly localized.
  "display": [
    {
      // OPTIONAL — Friendly display name of the issuer.
      "name": "walt.id Demo Issuer",
      // OPTIONAL — BCP47 language tag for this display object. One object per locale.
      "locale": "en",
      // OPTIONAL — Issuer logo metadata.
      "logo": {
        // REQUIRED in logo object — URI to fetch the logo (https:, data:, etc.). (
        "uri": "https://issuer.demo.walt.id/assets/logo.png",
        // OPTIONAL — Alt text for the logo.
        "alt_text": "walt.id demo logo"
      }
    }
  ],

  // REQUIRED — Map describing each credential this issuer can issue.
  // Keys are configuration IDs that also appear in Credential Offers and Authorization Details.
  "credential_configurations_supported": {
    // Example configuration ID for a JWT-VC (non-JSON-LD) credential.
    "BankId_jwt_vc_json": {
      // REQUIRED — Credential format identifier. For JWT VC (non-JSON-LD) use "jwt_vc_json".
      "format": "jwt_vc_json",

      // OPTIONAL — Scope value usable in the Authorization Request when requesting this credential.
      "scope": "BankId",

      // OPTIONAL — Algorithms the issuer uses to sign this credential format (JWS alg names).
      "credential_signing_alg_values_supported": ["EdDSA", "ES256", "ES256K", "RS256"],

      // OPTIONAL — How the issued credential is bound to Holder-controlled key material.
      // MUST be present when key binding is required; omit if not required.
      // Use 'jwk', 'cose_key', or DID method tags like 'did:web', 'did:key', etc.
      "cryptographic_binding_methods_supported": ["did:web", "jwk"],

      // OPTIONAL (and REQUIRED if cryptographic_binding_methods_supported is present) —
      // Proof type(s) the issuer accepts at the Credential Endpoint; Wallet references one of these in the request.
      "proof_types_supported": {
        // 'jwt' proof type: Wallet signs a JWT including 'aud' (issuer) and 'nonce' (c_nonce).
        "jwt": {
          // REQUIRED within proof type — Accepted signing algs for the proof JWT.
          "proof_signing_alg_values_supported": ["EdDSA", "ES256", "ES256K", "RS256"]
        }
      },

      // JWT VC (non-JSON-LD) format-specific parameter: credential_definition with VC types.
      "credential_definition": {
        // REQUIRED — VC type array as per VCDM; commonly includes "VerifiableCredential" and the specific type.
        "type": ["VerifiableCredential", "BankId"]
      },

      // OPTIONAL — Hints for Wallet UI on how to present claims and the credential card.
      "credential_metadata": {
        // OPTIONAL — Claim display metadata with JSON-path-like 'path' pointers.
        "claims": [
          { "path": ["credentialSubject", "given_name"] },
          { "path": ["credentialSubject", "family_name"] },
          { "path": ["credentialSubject", "account_number"] }
        ],
        // OPTIONAL — Overall card display hints.
        "display": [
          {
            "name": "Bank Identity",
            "locale": "en",
            "logo": {
              "uri": "https://issuer.demo.walt.id/assets/bankid.png",
              "alt_text": "Bank ID"
            },
            "background_color": "#12107c",
            "text_color": "#FFFFFF"
          }
        ]
      }
    }
  }
}
Step 2: Create a Credential Offer via a UI
For many use cases, generating a Credential Offer doesn't require writing code. An administrator can simply use a web portal, like the walt.id Web Issuer Portal to configure the credential and it's data, and the system will generate the corresponding QR code or offer link.
Try the Issuer Portal here
Step 3: Create a Credential Offer Programmatically via API
For automated workflows you can trigger the process directly via an API call. The open-source Issuer API from walt.id for example will handle the subsequent exchanges with the Wallet to deliver the final credential.
You would typically make a POST request like the one below to create a credential offer. Execute the call in your termninal to create a credential offer for a Verifiable University Degree. You can claim it afterwards using the walt.id Wallet here.
curl -X 'POST' \
  'https://issuer.demo.walt.id/openid4vc/jwt/issue' \
  -H 'accept: text/plain' \
  -H 'statusCallbackUri: https://example.com/$id' \
  -H 'Content-Type: application/json' \
  -d '{
  "issuerKey": {
    "type": "jwk",
    "jwk": {
      "kty": "OKP",
      "d": "JvJIpga2GD8LJeRu4Sv-mL4thE31DuFlr9PA04CIoZY",
      "crv": "Ed25519",
      "kid": "iJMS5bkZVIlncfq_Lf_SuxJ2JtQ5Hvaz7tWPnAjUUds",
      "x": "FZdvwC8aGhRwqzWptej0NZgtwYAI1SyFg1mKDETOfqE"
    }
  },
  "issuerDid": "did:jwk:eyJrdHkiOiJPS1AiLCJjcnYiOiJFZDI1NTE5Iiwia2lkIjoiaUpNUzVia1pWSWxuY2ZxX0xmX1N1eEoySnRRNUh2YXo3dFdQbkFqVVVkcyIsIngiOiJGWmR2d0M4YUdoUndxeldwdGVqME5aZ3R3WUFJMVN5RmcxbUtERVRPZnFFIn0",
  "credentialConfigurationId": "UniversityDegree_jwt_vc_json",
  "credentialData": {
    "@context": [
      "https://www.w3.org/2018/credentials/v1",
      "https://www.w3.org/2018/credentials/examples/v1"
    ],
    "id": "http://example.gov/credentials/3732",
    "type": [
      "VerifiableCredential",
      "UniversityDegree"
    ],
    "issuer": {
      "id": "did:web:vc.transmute.world"
    },
    "issuanceDate": "2020-03-10T04:24:12.164Z",
    "credentialSubject": {
      "id": "did:example:ebfeb1f712ebc6f1c276e12ec21",
      "degree": {
        "type": "BachelorDegree",
        "name": "Bachelor of Science and Arts"
      }
    }
  },
  "mapping": {
    "id": "<uuid>",
    "issuer": {
      "id": "<issuerDid>"
    },
    "credentialSubject": {
      "id": "<subjectDid>"
    },
    "issuanceDate": "<timestamp>",
    "expirationDate": "<timestamp-in:365d>"
  },
  "authenticationMethod": "PRE_AUTHORIZED",
  "standardVersion": "DRAFT13"
}'
The API would respond with the Credential Offer, which includes the URI that you can then convert into a QR code or send to the user:
openid-credential-offer://issuer.portal.walt.id/?credential_offer=%7B%22credential_issuer%22%3A%22https%3A%2F%2Fissuer.portal.walt.id%22%2C%22credentials%22%3A%5B%7B%22format%22%3A%22jwt_vc_json%22%2C%22types%22%3A%5B%22VerifiableCredential%22%2C%22UniversityDegree%22%5D%2C%22credential_definition%22%3A%7B%22%40context%22%3A%5B%22https%3A%2F%2Fwww.w3.org%2F2018%2Fcredentials%2Fv1%22%2C%22https%3A%2F%2Fwww.w3.org%2F2018%2Fcredentials%2Fexamples%2Fv1%22%5D%2C%22types%22%3A%5B%22VerifiableCredential%22%2C%22UniversityDegree%22%5D%7D%7D%5D%2C%22grants%22%3A%7B%22authorization_code%22%3A%7B%22issuer_state%22%3A%220431b78c-cd94-4f50-bfdf-e24d436c0cf6%22%7D%2C%22urn%3Aietf%3Aparams%3Aoauth%3Agrant-type%3Apre-authorized_code%22%3A%7B%22pre-authorized_code%22%3A%22eyJhbGciOiJFZERTQSJ9.eyJzdWIiOiIwNDMxYjc4Yy1jZDk0LTRmNTAtYmZkZi1lMjRkNDM2YzBjZjYiLCJpc3MiOiJodHRwczovL2lzc3Vlci5wb3J0YWwud2FsdC5pZCIsImF1ZCI6IlRPS0VOIn0.NorG7GtjmA-HXMJfUzU9vfnshcIgFY0oYQb8qJjDfORPoNxuurgySSOIDKFi7Z4XJmC-oJZnM0Nbb0NUd57cDA%22%2C%22user_pin_required%22%3Afalse%7D%7D%7D
Follow the full API Guide here.
OpenID4VCI vs. OpenID4VP: The Full Lifecycle
A common point of confusion for developers new to this space is the relationship between OID4VCI and OpenID4VP. The distinction is simple yet fundamental:
- OpenID4VCI is for Issuance: It defines the protocol for an Issuer to securely give you a credential.
- OpenID4VP (Verifiable Presentations) is for Presentation: It defines the protocol for you to securely show that credential to a Verifier.
These are two separate but complementary specifications that fall under the broader OpenID for Verifiable Credentials (OID4VC) umbrella. Together, they cover the entire lifecycle of a credential. The architectural separation is a deliberate design choice that enhances privacy and security. By separating the issuance and presentation flows, the original Issuer is not involved in the day-to-day use of the credential. This means the Issuer cannot track where or when you present your credential, a core principle of decentralized, user-centric identity.
Integrating OpenID4VCI with Keycloak
One of the most powerful features of OID4VCI is its ability to integrate with existing, standard-compliant Identity Providers (IdPs). Because the protocol leverages the standard OAuth 2.0 Authorization Code Flow, you can use an IdP like Keycloak to handle user authentication and provide the claims for a credential.
This allows you to issue credentials based on data that is verified in real-time by your existing, trusted identity system. The process works as follows:
- A user scans a QR code, and their Wallet initiates the issuance flow with your OID4VCI service.
- Your service, acting as an OAuth 2.0 client to Keycloak, redirects the user to your organization's Keycloak login page.
- The user authenticates successfully using their existing corporate or customer credentials.
- Keycloak returns an authorization token to your OID4VCI service.
- Your service uses this token to securely call Keycloak's
/userinfoendpoint and fetch verified claims about the user (e.g., name, email, role, user ID). - This trusted data is then mapped into the attributes of the Verifiable Credential, which is then signed and issued to the user's Wallet.
This method is perfect for enterprise or customer-facing scenarios where user data must be pulled from a source of truth like Keycloak, rather than being provided manually.
walt.id's Issuer API service can therefore be configured to use Keycloak or any other OIDC compliant Identity Provider to authenticate users and populate Verifiable Credentials with verified user claims.
Understanding OID4VCI Versions (Draft 11 vs. Draft 13 vs. OID4VCI 1.0)
The OID4VCI specification has evolved through multiple drafts to OID4VCI 1.0. The table below summarizes the key changes across Draft 11, Draft 13, and OID4VCI 1.0.
| Area | Draft 11 | Draft 13 | OID4VCI 1.0 |
|---|---|---|---|
| Credential Offer – key parameter name | credentials (array; strings and, in earlier drafts, objects seen in examples) | Renamed to credential_configuration _ids (array of string identifiers) | Kept as credential_configuration _ids |
| Issuer metadata – list of credential options | credentials_supported (structure evolved across early drafts) | Renamed to credential_configurations _supported; structure changed from array → map | Same (credential _configurations _supported) |
| Pre-Authorized Code flow – end-user code | Parameter user_pin_required | Replaced by a structured tx_code object (with description, length, input_mode, etc.) | tx_code retained |
| Credential Offer – by value vs by reference | credential_offer / credential_offer_uri defined | Same, clarified; examples updated and statement that offer cannot be signed | Same behavior and discovery model |
| Authorization request expression | authorization_details type openid_credential (and scope) | Adds option to reference by credential_configuration_id (not only format/type) | Same; plus end-to-end identifiers guidance |
| Token response identifiers | — | Option to return authorization_details with credential_identifiers to correlate in later steps | Same; referenced in flow summary |
| Request/response encryption parameters | Separate fields (credential_encryption _jwk, credential_response _encryption_alg, …_enc) | Grouped into credential_response _encryption object | v1 also defines request encryption via credential_request _encryption in Issuer metadata |
| Authorization server discovery list | authorization_servers singular (earlier text) | Now an array | Remains array |
| Batch issuance mechanics | Dedicated Batch Credential Endpoint (§ 8) | Still present as an optional endpoint | Removed as a separate endpoint; batching happens at the Credential Endpoint for multiple creds with the same format & dataset in one request |
| Nonce handling for proofs | c_nonce discussed within credential flow | Clarifications | New dedicated Nonce Endpoint (optional) to fetch fresh c_nonce; requirements for including c_nonce in proofs |
| Notification / status callback | — | — | New optional Notification mechanism: Issuer may receive notifications about status of issued credential(s) |
Implementations like walt.id's Issuer support multiple draft versions and OID4VCI 1.0 coming in Q4 2025.
Next steps
- OID4VP - Explore the protocol Verifiers use in more detail.
- How to issue a Verifiable Credential via OID4VCI - Checkout the walt.id Issuer API docs for issuing a VC via OID4VCI.